Solar Panels

Solar panels are mounted on black dodger, out of the way.
We have 4 x 50Watt solar panels on Cherokee Rose, (see Aft Of Mast for another photo) the best thing the previous owner put on the boat and he did a lot of things right. Maintenance free, always keeping your batteries conditioned, can't say enough wonderful things about them. A wind generator is good too however I have had constant maintenance, new brushes, bearings, cleaning rotor, cleaning contact, balancing etc, solar wins any day.. except the cloudy windy days :)
The power is fed into a regulator located in the back of the wiring cabinet behind the main control panel at the NavStation. From there it goes through a shunt so the Amp Meter can monitor the current and then directly to the battery bus bars located in the NavSeat.
If you ever need to pull the engine out (Call me it is pretty easy) you will need to remove the dodger and solar panels. The panels are attached to the dodger with hinges. Remove the screw pins in the front hinges and tilt up to get access to the wiring. Remove the wires, remove rear pins and lift off.
At anchor, we typically pull the boom right over with the preventers to get full access to the sun's rays. Even a halyard going across a panel can dramatically reduce its output.
Wind generator, or Windy

The Fourwinds wind generator by Everfair enterprises is one of the best and quietest on the market. The literature is in one of the file boxes in the sail locker so I will stop there with the sales speak and explain our setup. Windy has 3 brakes, a centripetal air brake attached to the blades, they say this will allow it to go through a hurricane! A bicycle brake operated by pulling a cord from the cockpit and finally an electric brake. This is simply a switch on the control panel (very top left) that reverses the positive and negative hence as it spins it generates power that is fed back to itself and as it is basically just a DC motor it stops itself. This will not work in high winds hence the other two.
Windy generates power which is fed through a regulator situated under the nav station seat on the stbdside, the blue box. On the bottom side of the box, visible by a mirror is an on/off switch. There is a master switch on the control panel (middle bottom) that removes the power from the boat power. When you switch it off you will notice an increase in speed as it now has no resistance.
Windy generates power which is fed through a regulator situated under the nav station seat on the stbdside, the blue box. On the bottom side of the box, visible by a mirror is an on/off switch. There is a master switch on the control panel (middle bottom) that removes the power from the boat power. When you switch it off you will notice an increase in speed as it now has no resistance.
Service Info for Windy
I have found the best way to work on Windy is to just put her in the cockpit and remove the blades. Once up the pole, if you put a strap around you and the pole, you have two hands free. There are 4 screws keeping windy on the pole, two small ones go into a plastic collar and two bigger ones just push against the collar and are used to remove wobble but too tight and it won't turn with the wind. So loosen/remove 4 screws, remove one side of the bycicle brake and slide wire out and untie string from the tail. (This string is incase the other 3 brakes don't work you can use the boat hook to point it into the wind)
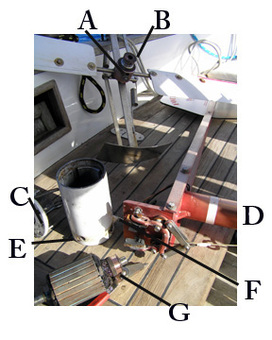
Once removed, the blade locking screws will not be obvious since all screws are covered with tape for corrosion protection. Bill, the owner of Fourwinds, sells some Kevlar tape to do the job but I have found that electrical tape, put on after a thorough cleaning with acetone lasts forever. The main pin through the shaft is in location "A" under the tape and under a locking nut, the one next to a big Phillips screw. At the edge of the shaft under more tape are 4 holes, each of these contains 2 tiny Allen key removable bolts. Remove the outer ones and just loosen the inner ones. Now with the use of a screw driver the blade and air brake should slide off.
The brushes are externally removable "E" without dismantling anything and could even be done up the pole. However, I am never happy assuming the problem and always remove everything to see for my self. On the Pacific crossing back to USA it took 3 hours to remove, dismantle, replace a bearing and put back up, so don't be scared. I typically check the bearings, check the brushes, polish the stator (the gold bars around the motor "G") use a sharp point to remove grime from slots between the gold bars, grease bearings and reassemble.
Notes on reassembly:
Spares/Tool:
Once removed, the blade locking screws will not be obvious since all screws are covered with tape for corrosion protection. Bill, the owner of Fourwinds, sells some Kevlar tape to do the job but I have found that electrical tape, put on after a thorough cleaning with acetone lasts forever. The main pin through the shaft is in location "A" under the tape and under a locking nut, the one next to a big Phillips screw. At the edge of the shaft under more tape are 4 holes, each of these contains 2 tiny Allen key removable bolts. Remove the outer ones and just loosen the inner ones. Now with the use of a screw driver the blade and air brake should slide off.
The brushes are externally removable "E" without dismantling anything and could even be done up the pole. However, I am never happy assuming the problem and always remove everything to see for my self. On the Pacific crossing back to USA it took 3 hours to remove, dismantle, replace a bearing and put back up, so don't be scared. I typically check the bearings, check the brushes, polish the stator (the gold bars around the motor "G") use a sharp point to remove grime from slots between the gold bars, grease bearings and reassemble.
Notes on reassembly:
- The wires exiting the motor must be on the bottom when finished; there is a tiny drain hole "F" in the seal around the wires.
- After a good acetone wipe, put tape round all places you removed it from.
- Coat all bolt ends and rim marked "C" with anti seize compound. I will leave my tub of gray goop; it gets everywhere but is very effective.
- Before replacing I use their brush cleaner to stick inside the tube marked "D" and polish up the contacts, same on top of the pole.
- Lastly I use a little silicone spray to provide a little lubrication in the plastic bits on top of the pole (avoid the contacts)
- FYI the bottom step on the pole is in the 4th tool draw unless I get busy and reattach it before we sell the boat. It was never a priority as I could climb the pole without it. The step was tapped on and really needed to be through bolted.
Spares/Tool:
- Brushes (all spares located in a yellow tub, second shelf below NavStation)
- Bolts
- Bearings
- Brush Cleaner (see photo below - I almost threw this away when I bought the boat located in the 4th tool draw)
